
The VIDE Quality Defect Detector (VIDE-DD) is responsible for the automatic diagnosis and presentation of quality defects within platform independent models. This encompasses structural as well as behavioral diagrams used to visually model a VIDE-based system. It uses information about the software model, stored within the VIDE PIM repository, to analyze the model, diagnose quality defects, and annotate the model using UML-Annotations. The information stored within these Annotations is then used by the quality defect presenting mechanism (an extension to the diagrams presentation mechanisms) to visually enrich the diagrams (within the VIDE visual editor) with information on these defects. These defects are symbolized using icons at the defective elements on the diagram, such as a class, a method, a relation or the diagram itself.
The presentation layer of the VIDE-DD focussed on the visualization of quality defects in UML diagrams. Figure 117 shows the different components of the VIDE-DD presentation layer, which we introduce briefly:
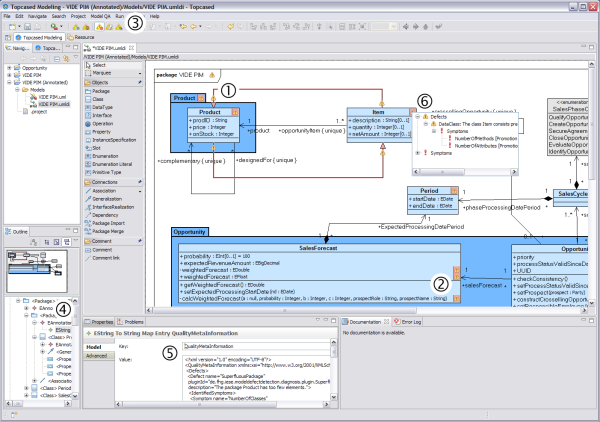
The graphical editor from Topcased is adapted to present Quality Defects for diagrams, packages, references and classes as well as for methods and attributes. Defective model elements are presented using small icons that can be varied based on the defect type (not shown in the screenshot).
Buttons & Menu enable the user to easily initiate a scan of the complete workspace or the selected Java file.
The defects are annotated directly in the model using UML Annotations (resp. EAnnotaions in EMF), which are shown in the model tree..
The defect description as well as the symptoms used in the diagnosis process is stored using a XML-based structure in the value-tag of the UML annotation.
This information in the annotations can also be displayed in the graphical editor within a context menu. The menu shows the tree structure of the XML-based information including descriptions and symptoms.
The quality defect view (not shown in the picture below) lists all defects diagnosed within the model and enables browing through the defects and diagrams where they occur.
As described in deliverable 8 “Specification of the VIDE software development platform and of VIDE architecture” the VIDE-DD module realized the use cases by implementing the following functionality:
Diagnose QDs in the PIM (model) from the repository.
Present (Show/Hide) the quality defects within the visual models.
View lists of quality defects
View quality defect description
Use Preferences for defect presentation
The functionality of the VIDE-DD plugins is controlled within a configuration file called “.de.fhg.iese.modeldefectdetection.xml”. Here the activated analysis plugins are listed and the mapping of diagnosis and analysis plugins is specified. An exemplary configuration file is listed in the following figure:
<?xml version="1.0" encoding="UTF-8"?>
<DefectDetectionConfiguration active="true">
<Visualization active="true">
<Diagrams>
<Diagram id="ClassDiagram" active="true"/>
</Diagrams>
</Visualization>
<Analysis>
<AnalysisPlugin pluginId="de.fhg.iese.modeldefectdetection.analysis.noo" active="true"/>
<AnalysisPlugin pluginId="de.fhg.iese.modeldefectdetection.analysis.noa" active="true"/>
<AnalysisPlugin pluginId="de.fhg.iese.modeldefectdetection.analysis.nop" active="true"/>
<AnalysisPlugin pluginId="de.fhg.iese.modeldefectdetection.analysis.nopa" active="true"/>
<AnalysisPlugin pluginId="de.fhg.iese.modeldefectdetection.analysis.nopo" active="true"/>
<AnalysisPlugin pluginId="de.fhg.iese.modeldefectdetection.analysis.noir" active="true"/>
<AnalysisPlugin pluginId="de.fhg.iese.modeldefectdetection.analysis.nocomments" active="true"/>
<AnalysisPlugin pluginId="de.fhg.iese.modeldefectdetection.analysis.norelationships" active="true"/>
<AnalysisPlugin pluginId="de.fhg.iese.modeldefectdetection.analysis.noactions" active="true"/>
</Analysis>
<Diagnosis>
<DiagnosisPlugin pluginId="de.fhg.iese.modeldefectdetection.diagnosis.lazyclass" active="true">
<AssociatedAnalysisPlugins>
<AnalysisPlugin pluginId="de.fhg.iese.modeldefectdetection.analysis.noo">
<Property name="Threshold" value="3"/>
</AnalysisPlugin>
</AssociatedAnalysisPlugins>
</DiagnosisPlugin>
<DiagnosisPlugin pluginId="de.fhg.iese.modeldefectdetection.diagnosis.largeclass" active="true">
<AssociatedAnalysisPlugins>
<AnalysisPlugin pluginId="de.fhg.iese.modeldefectdetection.analysis.noo">
<Property name="Threshold" value="6"/>
</AnalysisPlugin>
</AssociatedAnalysisPlugins>
</DiagnosisPlugin>
…
<DiagnosisPlugin pluginId="de.fhg.iese.modeldefectdetection.diagnosis.dataclass" active="true">
<AssociatedAnalysisPlugins>
<AnalysisPlugin pluginId="de.fhg.iese.modeldefectdetection.analysis.noo">
<Property name="Threshold" value="0"/>
</AnalysisPlugin>
</AssociatedAnalysisPlugins>
<AssociatedAnalysisPlugins>
<AnalysisPlugin pluginId="de.fhg.iese.modeldefectdetection.analysis.noa">
<Property name="Threshold" value="1"/>
</AnalysisPlugin>
</AssociatedAnalysisPlugins>
</DiagnosisPlugin>
<DiagnosisPlugin pluginId="de.fhg.iese.modeldefectdetection.diagnosis.indecentexposure" active="true">
<AssociatedAnalysisPlugins>
<AnalysisPlugin pluginId="de.fhg.iese.modeldefectdetection.analysis.nopo">
<Property name="Threshold" value="6"/>
</AnalysisPlugin>
</AssociatedAnalysisPlugins>
<AssociatedAnalysisPlugins>
<AnalysisPlugin pluginId="de.fhg.iese.modeldefectdetection.analysis.nopa">
<Property name="Threshold" value="3"/>
</AnalysisPlugin>
</AssociatedAnalysisPlugins>
</DiagnosisPlugin>
</Diagnosis>
</DefectDetectionConfiguration>
Figure 118: The VIDE-DD config file “.de.fhg.iese.modeldefectdetection.xml”This configuration file has to be copied or created within the folder of the project that includes the model(s) that are to be analyzed. Furthermore, the Topcased system has to be extended by the following VIDE-DD plugins
de.fhg.iese.modeldefectdetection
de.fhg.iese.modeldefectdetection.ui.editor.uml
de.fhg.iese.modeldefectdetection.perspective.basic
de.fhg.iese.modeldefectdetection.menus
de.fhg.iese.modeldefectdetection.views.defectlistview
de.fhg.iese.modeldefectdetection.analysis.* (several different analysis plugins)
de.fhg.iese.modeldefectdetection.diagnosis (several different diagnosis plugins)
After Topcased with VIDE-DD is started the VIDE programmer can create his models and then change to the VIDE-DD perspective to analyze the model. As shown in Figure 114 the VIDE-DD perspective enriches the Topcased perspective by a menu, a toolbar, and a defect list view 4.
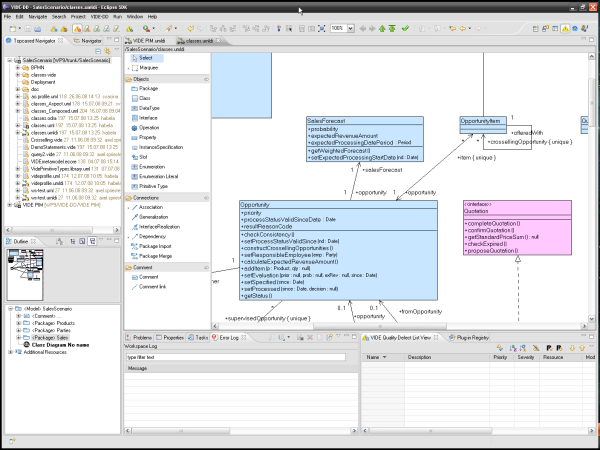
Figure 119: The VIDE-DD perspective
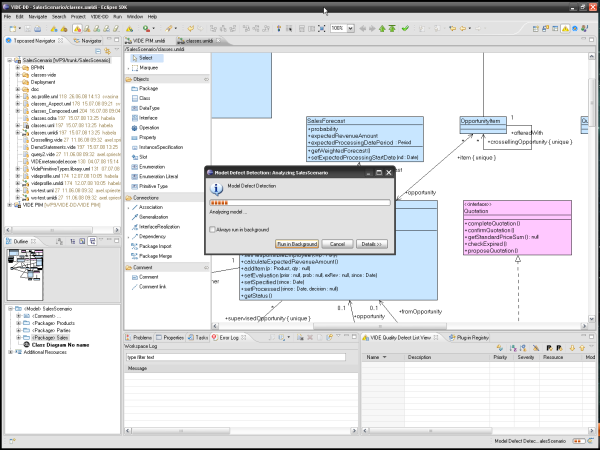
In order to start scanning a model the VIDE programmer has to select the “Scan Project” Button or menu entry. This will analyze the model behind the currently shown diagram. Scanning will take around a minute for a model with approx. 1500 elements and 10 defects.
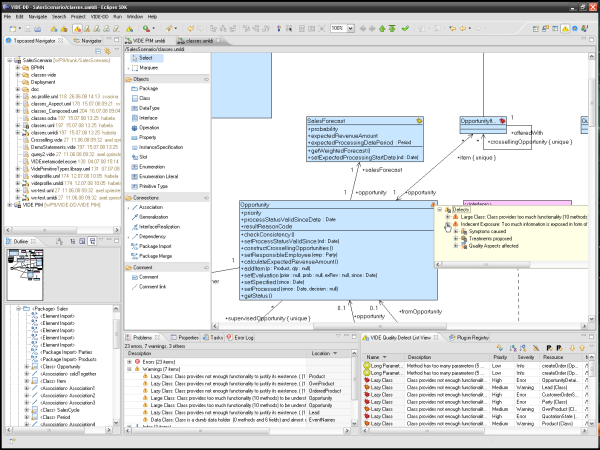
After the model is analyzed the defects are presented in the diagram, the VIDE-DD defect list view, the standard eclipse problem view, and in the outline as decorators for the elements within the model.
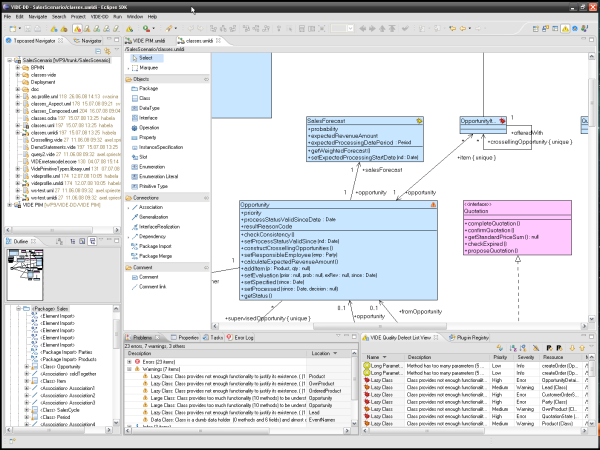
Figure 121: Defect presentation
For more Information the icons in the diagram can be selected. The show the diagnosed defects, decisions, and context factors (e.g., a design pattern). In the next picture only defects are shown and the VIDE programmer can get more information on the defect, used symptoms, proposed treatments and affected quality aspects.
Furthermore, the VIDE programmer can start actions on the element (see 3.6.6) the defects (see3.6.5), or the whole model / workspace (see3.6.7).
The main presentation area for defects is the VIDE defect view. Here the VIDE programmer can see all defects in the model and sort them by name, priority, or element. As functionality he can choose to ignore a defect, remove a defect, or increase or decrease the priority or severity of a defect.
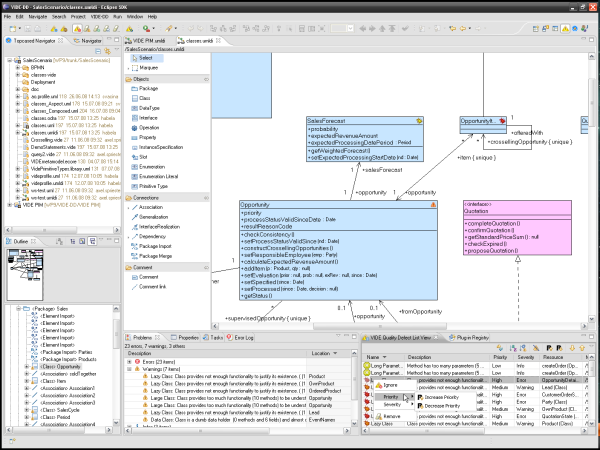
By double-clicking a defect it is focussed and highlighted within the diagram as well as the outline. Furthermore, he can use the next and previous buttons to browse through the defects and get the model elements highlighted.
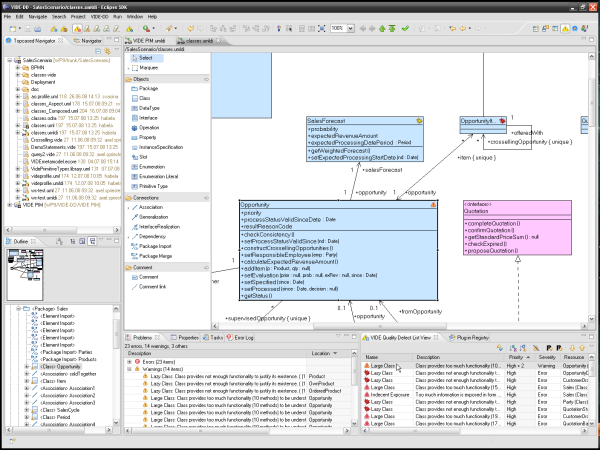
Figure 124: Browsing through defects
Ignoring a defect will leave them in the system, however, these ignore decisions will stay even if the defects are removed (they can also be removed if necessary).

The user can also choose to remove it completely, however, if no ignore decision was set it will return with the next scanning of the system.
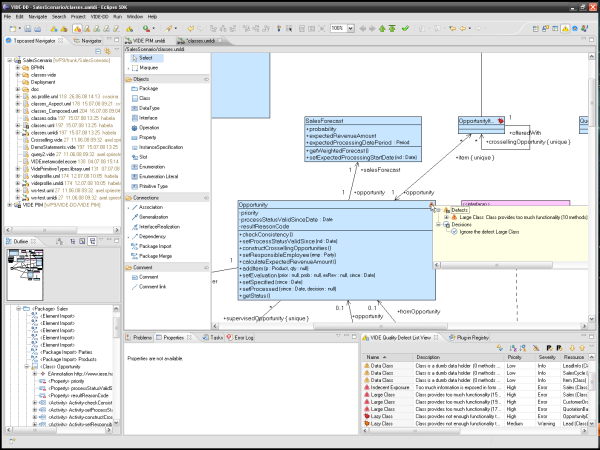
Ignored defects are listed in the Defect list, but if only ignored defects remain the Elements (e.g., the class) is checked with a special icon.For example, if the Indecent exposure defect was removed only the decision icon (the checkmark) is shown in the diagram.

Beside these defect-specific actions the VIDE-Programmer can also use several Element-specific actions, such as removing all defects for an element, ignoring al defect, or scanning the element.
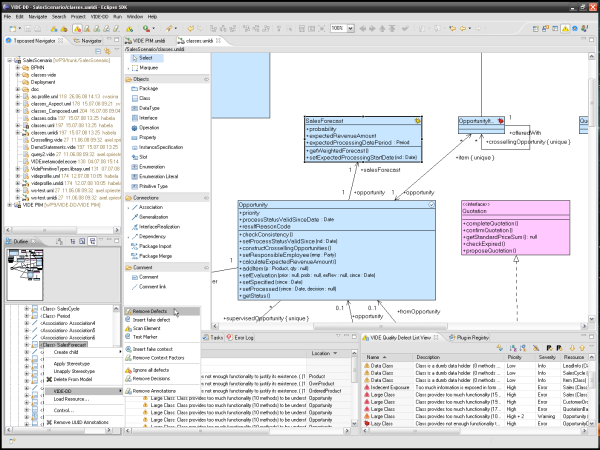
If all defects are removed from the Element only the decisions remain and are available (and used) after the next scan Element action.
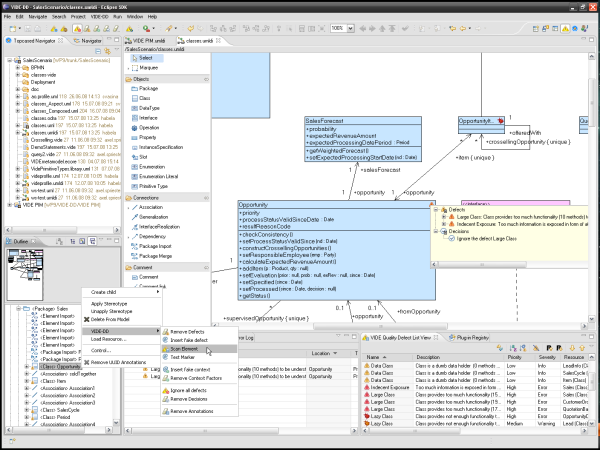
Figure 128: Context Menu and actions for model elements (scan element)
Another way of removing defects is, of course, the removal of the real problem. For example, if the attributes in the class Opportunity are all made private the quality defect “Indecent Exposure” will vanish.
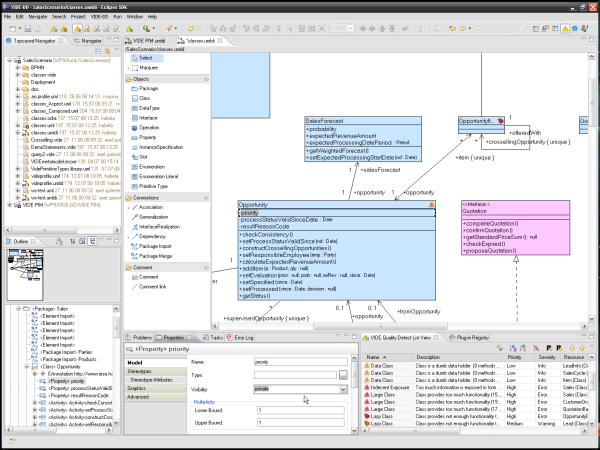
This will then result in a defect list without the treated defect.
The main actions available to the VIDE programmer are presented in the following figure. The actions are accessible in the VIDE-DD menu and the toolbar.
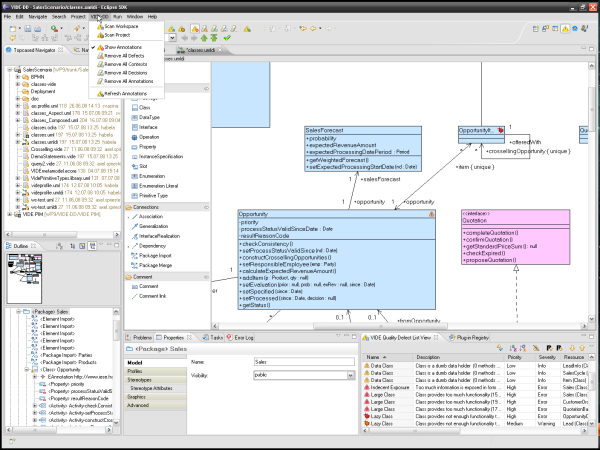
The actions include
“Scan workspace” to scan all Topcased projects within the workspace.
“Scan Project” to scan the model behind the currently open diagram in the Topcased editor
“Show Annotations” to hide or show the defects within the Topcased editor
“Remove all Defects” to remove all defects in the current active project.
“Remove All Contexts” to remove all context factors in the current active project.
“Remove All Decisions” to remove all decisions about defects in the current active project.
“Remove All Annotations” to remove all annotations in the current active project. This will clean the model from all information introduced by the VIDE-DD tool (incl. the EAnnotations).
“Refresh Annotations” Refreshes the defect presentation in the Topcased diagram (typically, not necessary)
The information about the defects, decisions, and context factors are stored within the model using EAnnotations as shown in the next picture. These annotations include the information in an XML-based format.
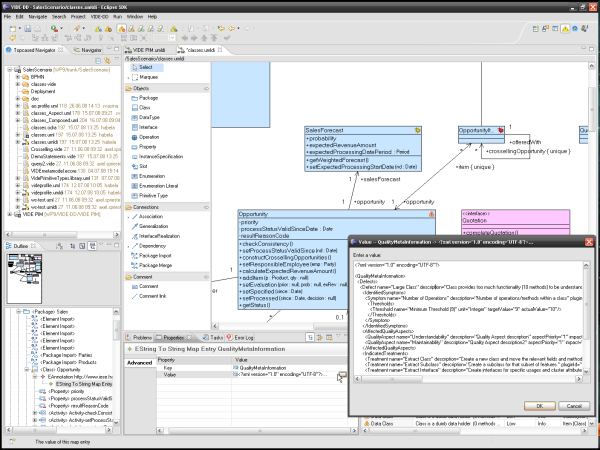
Figure 132: The Main Menu